
Adding an e-mail signature to your e-mails can provide the perfect way of ensuring that people have easy access to all of your important contact details.
Microsoft Outlook, one of the most commonly used e-mail clients offers the chance to create and use personalised signatures for all of your e-mail messages. In your signature, you can include text, images, your electronic business card, a logo, or even an image of your handwritten signature should you choose.
Once this has been done, you will be able to set you account to ensure that your new signature is automatically added to all outgoing messages.
Please Note – You also have the option to remove the signature from any e-mail before you send.
How To Add An E-Mail Signature
The video below highlights precisely which steps to follow to add a new signature. If you would like a little more information, please see below for our step by step guide.
Step 1 – Create a new email message.
Step 2 – On the Message tab, in the Include group, choose Signature > Signatures.

- In the E-mail account list, choose an email account to associate with the signature. You can have different signatures for each email account.
- In the New messages list, choose the signature that you want to be added automatically to all new email messages. If you don’t want to auto sign your new email messages, accept the default option of (none).
- In the Replies/forwards list, choose the signature that you want to be added automatically (auto sign) when you reply to or forward messages. Otherwise, accept the default option of (none).
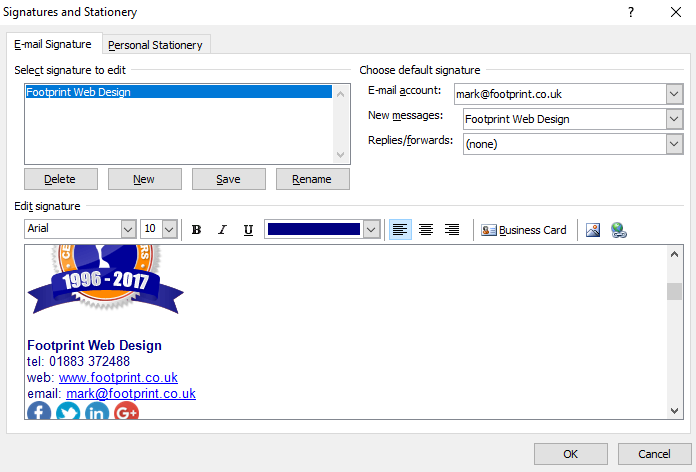
Step 5 – Under Edit signature, type or paste (if your signature has been created in Word) your new signature. Then choose OK.
You can change the appearance of any text you add by using the mini formatting toolbar above the text box. You can also add social media icons and links.
Please Note – For more information, please visit Microsoft’s official guide to adding additional information into an e-mail by clicking here.
Adding a Signature Manually To An E-Mail
Should you opt not to insert a signature for all new messages or replies and forwards, you will still have the option to add one manually. Simply follow the steps below:
Step 1 – In your email message, in the Include group on the ribbon, select Signature.
Step 2 – Choose your signature from the fly-out menu that appears.
Further Information
If you’d like to speak to us regarding any of our services, please give us a call on 01883 372488 or contact us via Facebook and we’ll be happy to talk you through your options.