
Offering the ideal way to personalise your e-mails along with promoting key information such as:
- Your website URL
- Your logo
- Your business address
- Social Media channels
The addition of an e-mail signature can be hugely beneficial. One of our most commonly received questions relates to adding an e-mail signature to outgoing e-mails. Depending on the platform or device that you are using, the process can actually be a little different.
Below, we have a guide to adding an email signature when using a Mac.
How To Add An Email Signature On A Mac
You can create prepared text, called a signature, to include when you send email messages. For example, you can create one signature for your work email and another signature for your personal email.
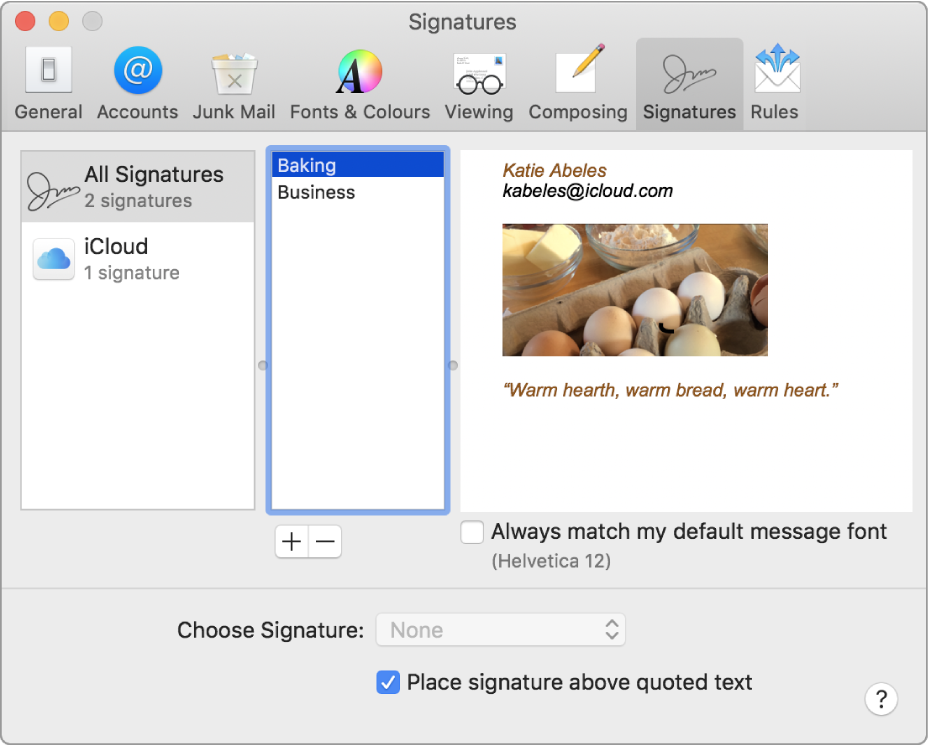
Creating signatures
- In the Mail app
 on your Mac, choose Mail > Preferences, then click Signatures.
 - In the left column, select the email account where you want to use the signature.If All Signatures is selected when you create a signature, you’ll need to drag the new signature to an email account before you can use it.
- Click the Add button below the middle column.
- In the middle column, type a name for the signature.The name appears in the Signature pop-up menu when you write a message.
- In the right column (the preview), create your signature.You can use the Edit or Format menus in Mail to change the font or layout, turn text into links, or check spelling. To add an image, drag it into the preview area.
If you want your signature to appear after the original text of messages you reply to or forward, deselect the “Place signature above quoted text” tickbox.
Deleting signatures
- In the Mail app on your Mac, choose Mail > Preferences, then click Signatures.
- Select a signature in the middle column, then click the Remove button .
When you delete a signature from All Signatures, it’s deleted from any account that uses it.
Automatically add a signature to emails
You can choose a signature to automatically add to messages you send.
- In the Mail app on your Mac, choose Mail > Preferences, then click Signatures.
- Select an account in the left column.
- Click the Choose Signature pop-up menu, then choose a signature.If you have more than one signature for an account, Mail can automatically alternate between them — choose At Random or In Sequential Order from the pop-up menu.
If you want to stop having a signature automatically added to your messages, click the Choose Signature pop-up menu, then choose None.
Adding a signature to emails yourself
- In the Mail app on your Mac, click the Signature pop-up menu in the message you’re writing.
- Choose a signature.If you don’t see an expected signature in the pop-up menu, choose Edit Signatures to open Signatures preferences and verify the signature is in the account.
Removing a signature from emails
- In the Mail app on your Mac, click the Signature pop-up menu in a message you’re writing, then choose None.
Depending on how a recipient’s mail server handles signatures, your signature may appear as an attachment or image to the recipient.
If you use iCloud Drive on your Mac and other devices, your signatures are automatically updated and available on those devices. See Use iCloud Drive to store documents.
If you need to send a signed PDF document, you can use Markup in Mail to create a handwritten signature and add it to the document. You can also use the Preview app to fill out and sign PDF forms.
Contact Us
If you would like to speak to someone about personalising your e-mails, please contact Footprint Web Design on Tel. No. 01883 372488 today.