
This article will explain how to set-up your email on your Android phone.
 |
For easy email and calendar management, we recommend you set up email in the Outlook for Android mobile app. |
| Are you using AOL mail? If so, this page can’t help you! Please contact AOL support for help. This page and the settings available on this page are for Outlook.com and Office 365 for business users only. |
Please Note – The instructions below are correct as of 4th October 2019.
Step 1
Note: If you have a work account that requires the Intune Company Portal app, install it from the Google Play Store before setting up Outlook for Android. Your IT admin may or may not also require you to Enroll your Android device in Intune.
Install the Outlook for Android app from the Google Play Store and then open it.
Tap Get Started if this is your first time.
Otherwise, to add another email account, open the Menu  > Settings
  > Add Account > Add Email Account. Then skip to step 4 under Set up another email account below.
Step 2
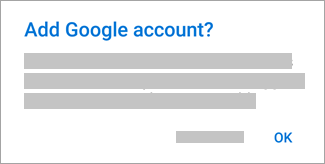
Outlook may detect your Google accounts. To add them to Outlook for Android, tap Google Connect Account and then tap OK to confirm. Tap Allow to give Outlook access to your Contacts.

 If you don’t want to add these accounts, tap Skip and then go to step 4 under Set up another email account below..
Step 3
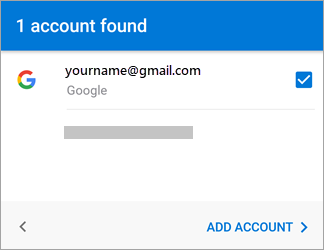
Select the accounts you’d like to add and tap Add Account. You may be asked to sign in.
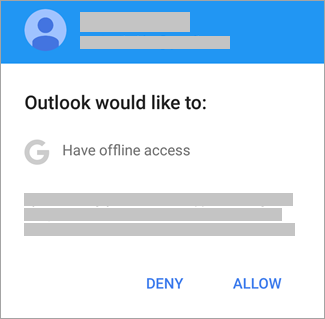
 Tap Allow to confirm offline access and any other prompts.
 To add another email account, tap Continue and go to Step 4, otherwise tap Skip.
Set up another email account
Step 4
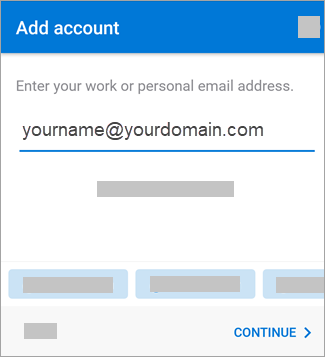
Enter your full email address, then tap Continue.
Note: If you’re asked to choose your provider, you’ll have to Set up your Exchange manually or set up an IMAP or POP account.
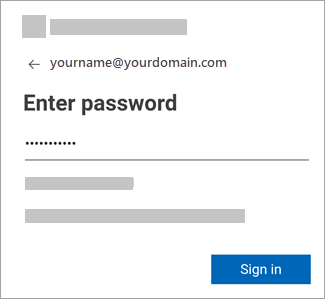
Step 5
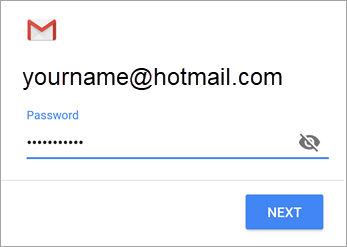
Enter your email account password and tap Sign In or Next.
Note: The sign in screen may look different for you depending on your email provider.
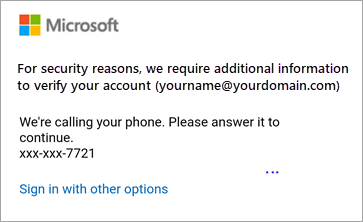
Step 6
If multi-factor authentication is enabled, verify your identity. For more information, see Security info overview.
Old Instructions
Choose your built-in Android email app:
Before you begin, update the Gmail app to the latest version:
- Open the Google Play Store app on your phone or tablet.
- Type “Gmail” into the search bar and then select Update.
Note: If the update option is not available, you’re already on the latest version.


Open the Gmail app.
Tap the menu icon in the upper left corner > Settings > Add account > Exchange and Office 365.
Important: Do NOT choose “Outlook, Hotmail, and Live” unless you want to sync email only and not calendar/contacts.

Enter your full email address and tap Next.
Enter your password and tap Next.

Follow steps for your account type:
- Outlook.com users: skip this step
- Exchange or other accounts: you may have to ask your IT admin or email provider for server settings and set up your account manually
- Office 365 work or school: you may see a Redirect requestscreen. Tap OK.
 On the Incoming server settings screen, change your server to outlook.office365.com.
 On the Incoming server settings screen, change your server to outlook.office365.com.
Follow any prompts you may get for security or device permissions, sync settings, and more.
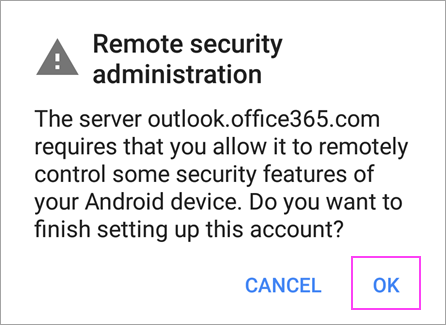
If you have an Office 365 work or school account, you may also be asked to confirm Remote security administration and approve additional security measures. In this case, choose OK or Activate.

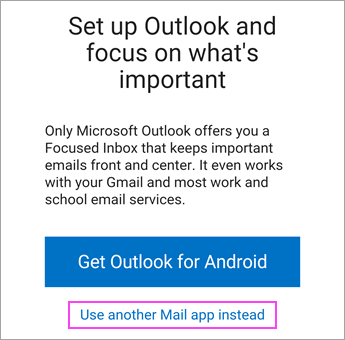
Go to the inbox you just set up. If you see an email that says “Action Required to Sync Email,” open it and tap Use another Mail app instead.
If you don’t see this message and emails are syncing, skip this step.

Pull down the Android notification bar by swiping down from the top of your screen.
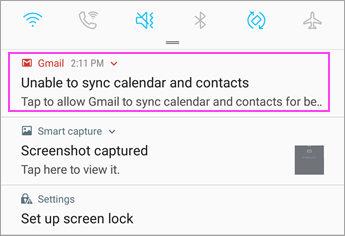 If you see a notification that reads “Unable to sync calendar and contacts,” tap it. Then tap Allow to give access and you’re done!
Note: If you don’t see a sync error, verify your calendar and contacts are syncing.
Set up email as IMAP or POP
You can set up your email account manually using IMAP or POP instead of Exchange ActiveSync. This means that only your email will sync to your phone, not calendar or contacts. What are POP and IMAP?
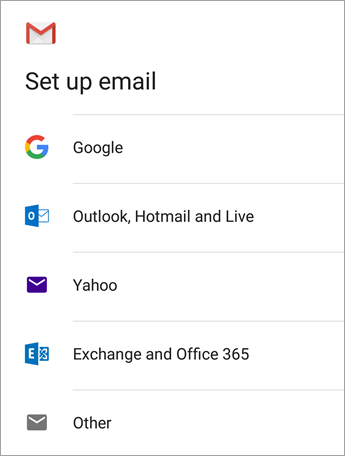
- Open the Gmail app. Go to Settings > Add account > Other.
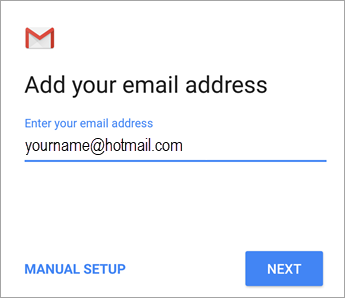
- Enter your full email address, such as yourname@hotmail.com and then tap Manual Setup.
- Choose Personal (IMAP) or Personal (POP3).
- Enter your password and tap Next.
Important: If you get a security error, close the Gmail app and then go through the steps again.
- If you’re prompted to enter settings, use these for the options available:
Incoming Server Settings
- DomainUsername
Make sure your full email address appears. For example, yourname@outlook.com. - Password
Use the password that you use to access your email. - Server
- Use imap-mail.outlook.com for Outlook.com IMAP accounts.
- Use pop-mail.outlook.com for Outlook.com POP accounts.
- Use outlook.office365.com for any work or school accounts on Office 365 for business.
- For Exchange email accounts, contact your email provider or system administrator.
- Port
- Use 993 for IMAP.
- Use 995 for POP.
- Security type
Select SSL/TLS or make sure the Use secure connection (SSL) checkbox is checked, then tap Next.
Outgoing SMTP Server Settings
- SMTP Server
- Use smtp-mail.outlook.com if you’re using an Outlook.com account.
- Use smtp.office365.com if you have an Office 365 for business account.
- For Exchange email accounts, contact your email provider or system administrator.
- Security Type
Choose TLS. - Port Number
Enter 587. Tap Next.
- DomainUsername
- Follow any prompts you may get, including security permissions and setting a display name.
- You’re now ready to use your email in the Android Gmail app!
An Alternative Guide
Perhaps the easiest way to do this is the follow the guidelines established in the video below.
Please note: The steps to set up your mailbox on your Android phone may differ slightly depending on the Android device that you have. The below instructions have been created using the Samsung Galaxy S device, and might vary slightly from other devices.
To set-up your Android Smartphone device to send and receive email, please do the following:
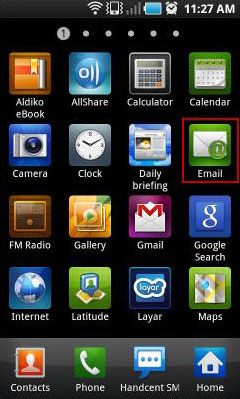
Step 1 – Click on Email icon in the main menu.
Step 2 – If this is the first time adding an email account, you will be immediately prompted to add a new account. If you already have an account created, click on the Options button, then Accounts button to create a new account.
Step 3 – Type your Email address and Password then click on Next button to continue.

Step 4 – Click on the POP3 account or the IMAP account depending on the type you want to use.
Note – Typically we would expect you to use the ‘POP3’ option here.
Step 5 – Fill in the following details:
- Your full email address in the User name field.
- Your email address password in the Password field.
- If you have selected POP3 then type in pop.example.co.uk into the POP3 server field.
- If you have selected IMAP then type in imap.examle.co.uk into the IMAP server field.
- 143 for IMAP and 110 for POP3 as the Port number.

Click on the Next button.
Step 6 – Fill in the following details:
- smtp.123-reg.co.uk in the SMTP Server field.
- 25 as the Port number.
- Click on the Require sign-in tick box.
- Your full email address in the User name field.
- Your email address password in the Password field.

Click on the Next button.
Your Android device will now check your settings with the server. Select the email checking frequency settings and click on the Next button.
Step 7 – Enter a name for the account. The account name is there for you to easily identify the email account in your phone if you have multiple email accounts set up.
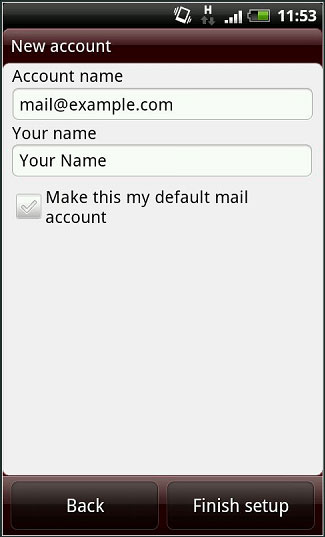
Step 8 – Click Finish set-up to finish the set-up.