
What Are YouTube Shorts?
YouTube Shorts is a way for anyone to connect with a new audience using just a smartphone and the Shorts camera in the YouTube app.
YouTube’s Shorts creation tools make it easy to create short-form videos that are up to 60 seconds long with our multi-segment camera.
To create a short video on YouTube:
- Sign in to the YouTube app.
- Tap Create
 Create a Short.
 - To make your Short longer than 15 seconds, tap 15s in the upper-right corner to record up to 60 seconds (60).
Note: Recording with music from our library or the original audio from other videos is limited to 15 seconds. - To record a clip, hold Capture or tap it to start recording and then again to stop.
- Tap Undo
to remove the previous video clip that you recorded or tap Redo
to add it back.
- Tap Close choose to Start over or to Save as draft and exit the camera.
- Tap Done
to preview and enhance your video.
- Tap Back
to return to the record screen. You can also tap Back
- Tap NEXT to add details to your video. From this screen, add a title (max 100 characters) and choose settings, like video privacy.
Note: The default video privacy setting for creators aged 13–17 is private. If you’re 18 or older, your default video privacy setting is set to public. Everyone can change this setting to make their video public, private or unlisted. - Tap Select audience ‘Yes, it’s Made for Kids‘ or ‘No, it’s not Made for Kids‘ to choose your audience. Learn more about Made for Kids.
- Tap UPLOAD SHORT to publish your Short.
YouTube is always testing new ways to deliver content to viewers. This is especially true for Shorts.

At the moment, viewers may find your Shorts by tapping Shorts ![]() at the bottom of the YouTube app. They may also find Shorts:
at the bottom of the YouTube app. They may also find Shorts:
- On the YouTube homepage.
- In their notifications.
- Checking their Subscriptions.
- Featured on your channel homepage. Learn how to customise your channel layout.
- Once they tap into a Short, viewers can scroll to watch more short videos.
Wherever they find them, subscribers gained from watching your Shorts count towards Creator Awards programme milestones.
Top Tip – Include #Shorts in your short video’s title or description to help our system recommend your Shorts across YouTube. For more info on hashtags on YouTube, go to Add hashtags to your video.
Further Information
If you’d like to speak to us regarding any of our services, including our online marketing services, please give us a call at 01883 372488 or contact us via Facebook and we’ll be happy to talk you through your options.
Currently Browsing: What Are YouTube Shorts?
Problems Sending or Receiving E-Mails on Your iPhone or iPad? Try This.
If you can’t send or receive emails in the Mail app on your iOS device, learn what to do.
Before you begin
iOS backups made in iCloud and iTunes back up your mail settings, but not your emails. If you delete or change your email account settings, previously downloaded emails might be removed from your iOS device.
When you’re ready, try the steps below. After each step, see if you still need help.
Make sure that your device can connect to the Internet
To see if your device has a cellular-data or Wi-Fi Internet connection, go to Safari and open a webpage, like www.apple.com.
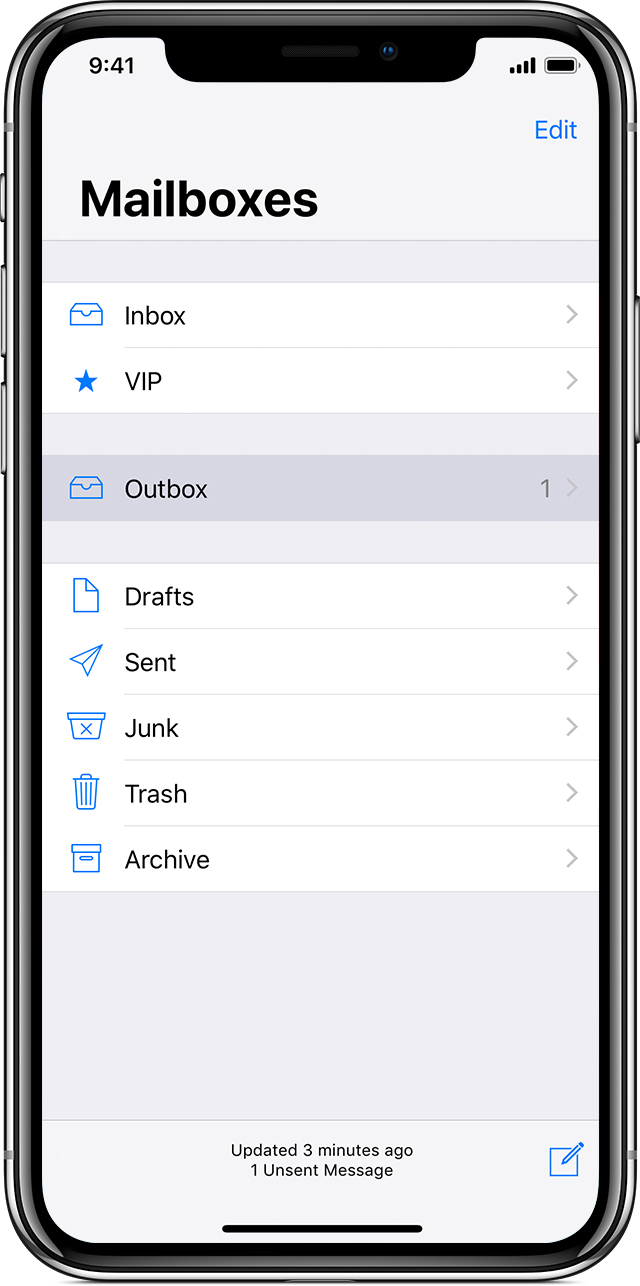
Check the Outbox for unsent emails
If you see a message that says your email wasn’t sent, then that email goes to your Outbox. Check your Outbox and try to send the email again:
- In Mail, tap Mailboxes in the upper-left corner.
- Tap Outbox. If you don’t see an Outbox, then your email was sent.
- Tap an email in the Outbox. Make sure that the recipient’s email address is correct.
- Tap Send.
Check your email address and password
If Mail asks you to enter a password for your email account, make sure that your password is correct. To check your email address and password, sign in to your email provider’s website.
If you still get a username or password error, contact your email provider or system administrator.
Check your settings
When you set up your email account on your device, iOS automatically uses the correct account settings for many email providers.
To make sure that your account settings are correct, compare the settings in the Mail app to the settings for your email account:
- Go to Settings > Passwords & Accounts and tap your email account.
- Tap your email address next to Account to see the account information, such as the incoming and outgoing mail servers.
- Check the recommended settings for your email account in the Mail Settings Lookup tool and make sure that they’re the same as what you see on your screen. If you don’t see the settings for your email account, contact your email provider or system administrator.
If you have a POP3 email account, then you can only check email on one device at a time. Close other email programs and sign out of webmail sites that you have open. To check if your email is a POP3 account, go to Settings > Passwords & Accounts, tap your account, tap Account, and then look for the label POP Account Information. You can also check the recommended email settings for your POP3 email account in the Mail Settings Lookup tool.
If your email provider requires your account to use port 25, then you can only send an email when you’re connected to your email provider’s network. Check with your email provider for settings and availability.
If you still need help
Contact your email provider. You can also remove your email account, and then set it up again.
Contact your email provider or system administrator
- Contact your email provider or check their status webpage to see if there’s a service outage.
- Ask your email provider or system administrator if you turned on any security features or restrictions, like two-step verification, for your email account. You might need a special password or may need to request authorisation from your email provider to send and receive emails on your device.
- Check your email account settings with your email provider or system administrator to make sure that they’re correct.
Remove your email account and set it up again
- On your computer, sign in to your email provider’s website. Make sure that all of your emails is there or make sure that your email is saved somewhere other than your iOS device.
- On your iOS device, go to Settings > Passwords & Accounts.
- Tap the email account that you want to remove.
- Tap Delete Account.
- Add your account again.
For more on this, please click here.
Further Information
If you’d like to speak to us regarding any of our services, including our online marketing services, please call us at 01883 372488 or contact us via Facebook and we’ll be happy to talk you through your options.
Currently Browsing: Problems Sending or Receiving E-Mails on Your iPhone or iPad? Try This.
How To Add An Email Account To Your Android Phone
You can easily add an email account to your smartphone. Follow the steps below to find out how.
Automatic Setup
To set up your email account, you will need to:


Please note:
- if you’re having trouble connecting, you may need to follow the steps in Manual Setup
- screenshots may look different depending on the email provider used
Manual Setup
To set up your email manually, you will need to:


Configuration details for Hotmail:
Type: Web & POP3
email format username@live.com
Username format: Full email address
Incoming mailserver: pop3.live.com
Outgoing mailserver: smtp.live.com
You may need to configure your email account within its settings. You can find more details on Microsoft and Hotmail email here.
Configuration details for Google Gmail:
Type: Web & POP3
email format: username@gmail.com
Username format: Full email address
Incoming mailserver: pop.gmail.com
Outgoing mailserver: smtp.gmail.com
SMTP port: 465
TLS/SSL required: Yes
You may need to configure your email account within its settings to allow the app to access your Gmail. You can get support from Gmail on Gmail account settings here.
Further Information
If you’d like to speak to us regarding any of our services, including our online marketing services, please call us at 01883 372488 or contact us via Facebook and we’ll be happy to talk you through your options.