
We Are Recruiting
We are currently looking for a top -class account manager to head up sales and marketing for our sister company www.forecourtplus.co.uk

Ideal candidate would be from motor/sales/IT background. Sales/Marketing/Managerial/Director level.
Excellent package and shares for the right person.
Based SE England.
For further information please contact:
Ant Parker on Tel. No. 01883 372488 or via e-mail: ant@footprint.co.uk
How Can I Set-Up An E-Mail Account On My Computer?
There are a few questions which we are asked more often than ‘how can I set-up an e-mail account on my computer?’ A cause of great confusion and aggravation in equal measure for many people, it’s really not as complicated or daunting as it may seem.
To help you along the way, we have drawn up a step by step guide which will help you to set up your account and hopefully stop you throwing your computer out of the window in the meantime!
For the purposes of this guide, we are going to use Microsoft Outlook as the e-mail client but in future posts, we will cover as many different clients as possible.
Please Note – The instructions below are correct as of 4th October 2019.
Set up email in the Mail app for Windows 10
Notes:
- Seeing a message that your account is out of date? You probably need to update your account settings. See Fixing an out-of-date account for more information.
- Did you set up your email, but you don’t see your messages? Change your mailbox sync settings.
Add a new email account
- Open the Mail app by clicking the Windows Start menu and choosing Mail.

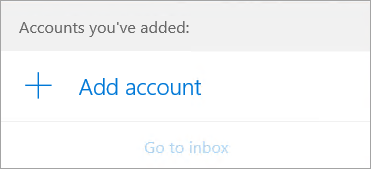
- If this is the first time you’ve opened the Mail app, you’ll see a Welcome page. Select Add account to get started.
If you’ve used the Mail app before, at the bottom of the left navigation pane, select Settings
, and then choose Manage Accounts.Note: On a phone or tablet, tap the three dots at the bottom of the page to access Settings.
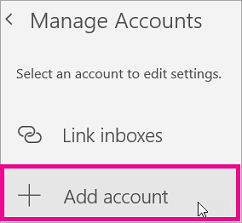
- Select Add account.
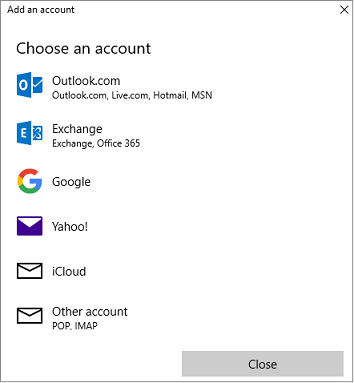
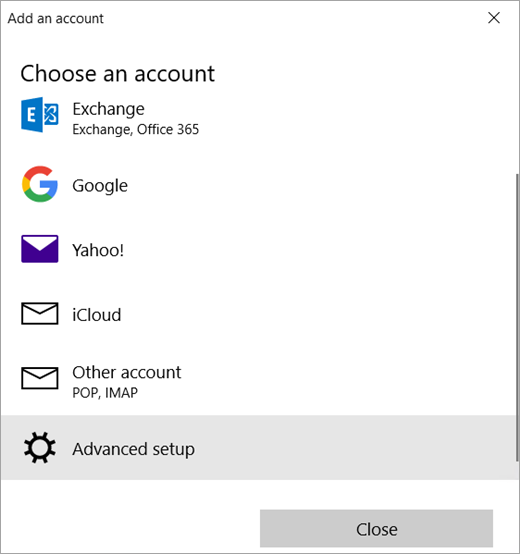
- Choose the type of account you want to add.
Notes:
- You may need to scroll down the Add an account dialogue box to view all options.
- If you choose Google, you’ll need to sign in to your Google account, enter your 2-step verification code if you’ve enabled that security feature, and give Windows permission to access your information. Click Allow and your account will be created.
- If you choose another email account, you’ll need to follow the special instructions under Special instructions for other accounts below.
- Enter the required information and click Sign in. For most accounts, this is your email address, password, and the account name. The account name is what you’ll see in both the left pane of Mail for Windows 10 as well as the Manage Accounts pane.
Note: If you receive the message “We couldn’t find info for that account. Make sure that the email address is correct and then try again,” you’ll need to click Try again three times before the button changes to Advanced. Click Advanced and follow the steps in the next section to add your account.
- Click Done. Your data will start syncing as soon as your account is set up.

 , and then choose Manage Accounts.
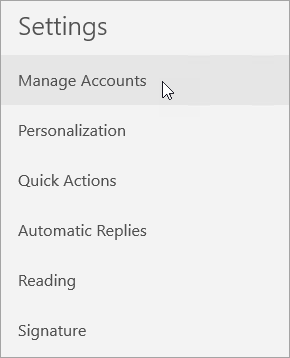
Note: It may take a few minutes for your account to synchronize. During this time, you may see “Not synced yet” in the message pane. If this message persists, see Resolve sync issues in Mail and Calendar apps in Windows 10.
Add an account using advanced setup
There are two ways you can access the Advanced setup options for your email account.
- Click Advanced setup if your automatic email setup fails in Step 3 above.
- Click Advanced setup from the Choose an account window in Step 2 above. The Advanced setup option is the last option on the list, and you may have to scroll to see it.
You can choose an Exchange ActiveSync account or an Internet email account. Unless your administrator has instructed you to use Exchange ActiveSync, click Internet email.
Enter the following information in the Advanced setup window.
- Email address This is the name you’ll see in the left pane of the Mail app.
- User name This is your full email address.
- Password Enter your email account password.
- Account name This is the name that you’ll see in the left pane of Mail for Windows 10, as well as in the Manage Accounts pane. You can choose any name you want.
- Send your messages using this name Enter the name you want recipients to see when they receive your message.
- Incoming email server You can get this information from your ISP or administrator. Usually, an incoming mail server address is in the format of mail.contoso.com or imap.google.com. For many email accounts, you can find this information in our POP and IMAP server name reference.
- Account type Choose POP3 or IMAP4. Most email accounts use IMAP4. If you don’t know which one to choose, contact your ISP.
- Outgoing (SMTP) email server You can get this information from your ISP or administrator. Usually, an outgoing email server address is in the format of mail.contoso.com or smtp.contoso.com.
- By default, all four checkboxes at the bottom of the window will be selected. Most email accounts don’t require any changes to these options.
Your email provider can give you the settings you need to fill in the Advanced setup but you can also go to the POP and IMAP server name reference we’ve provided for the most popular email providers.
After you’ve entered the required information, click Sign in > Done.
Old Instructions
Older Versions of Outlook
If you are using an older version of Microsoft Outlook, please follow the steps below:
First of all – Step 1
Before starting the set-up process, you will need to ensure that you have obtained some vital information from your ISP (Internet Service Provider). The highlighted words below are the details which must be identified and an example of what you will need can be found below:
- Username: johnsmith@ntlworld.com
- Password: hijerkjdf
- Incoming Mail Server: mail.ntlworld.com
- Outgoing Mail Server: mail.ntlworld.com

Once you have done this you can move onto Step 2 –
Simply click on the option to ‘Add a new e-mail account’ and then click next.

Step 3 –
The standard e-mail server for the vast majority of people will be ‘POP3’, (we will discuss the other options in a later blog), therefore all you need to do for step 3 is to click on ‘POP3’ and then click next.

Step 4 – The next step involves filling in the details which you have obtained from your ISP.

You are almost there! Once you have filled in all of the relevant details, the next step – Step 5 – is to click on the ‘Test Account Settings’ button, this will check that all of the details are correct by sending a test e-mail through to your e-mail address.
Step 6 is the final one. After click on the ‘Test Account Settings’ button, simply click of ‘next’, if all is well, you will see the message below. Your e-mail account is all up and running.

Currently Browsing: How Can I Set-Up An E-Mail Account On My Computer?
Blogging for Businesses
A blog is without doubt, one of the most powerful tools you can have in your on-line marketing arsenal. An effective offers the ability to increase website traffic, engage your customers, promote your brand and hopefully convert site visitors into paying customers.
Hugely search engine friendly (Google absolutely love blogs!), they are now one of the primary factors in a successful SEO campaign.
Choose Your Topics Carefully
Blogging offers a highly effective method of communicating with your customers. When utilised correctly, blogs are a great source of unique content on topical issues. An  often made mistake though is using your blog to write endless posts telling the world how great you company and its services/products are. Generally (and not surprisingly!) people have no interest in reading this type of content. People strive for something specific, something relevant, so taking the time to identify the burning current issues can pay huge dividends.
Enabling Comments
User comments, whether they or good or bad, are an excellent way of opening up lines of communication with your customers. It’s always recommended to incorporate a ‘Blog Policy’, which will allow you to outline the rules regarding comments to ensure that nothing abusive or personal will be tolerated.
This is not to say that everything needs to be positive and as such it is very important that the blogger responds to any negative comments which may be left. Other readers of your blog will read any comments which are left and will always be interested to see what sort of response negative comments receive. By taking the time to address the issue and highlighting how the problem can be resolved, you are likely to create a much better impression that be ignoring it.
When you receive comments, always try to respond. Should a reader put their name on the comment, thank the reader with that name. This builds up your engagement and shows you are interested in customer feedback no matter how good or bad it is. It is small things like this that will draw the reader back to your blog.
There is no holy grail which will transform your blog into a tool that is guaranteed to drive traffic to your website but by making it useful, writing it regularly, and writing about topics that your audience will want to read about, you will be well on your way to taking your website and your business to another level.
Further Information
If you’d like to speak to us regarding any of our services, give us a call on 01883 372488 or contact us via Facebook and we’ll be happy to talk you through your options.